Saturday, July 19, 2014

Things have been busy around here the last week or so. In anticipation of a tear down on my motorcycle that will include rebuilding the motor and blasting/painting the frame, hopefully updating the electrical system, and installing new exhaust, as well as some other things, I have been building a table/bench where I can work on it all. During the final steps of building said table/bench the other night, I heard a motorcycle coming up my street. I turned my head and saw this guy at the bottom of my driveway. This is Frank. Heather likes to joke that I met Frank online and that's pretty much true. I know him from a vintage Honda forum. Frank is a teacher that just retired this year and, to celebrate, he is riding around the US. We have a lot in common and I told him if he was near, to drop by. He did. He's been on the road for 5 days now and done 3300 miles which is silly. He will probably be on the road for another 4-5 weeks. 


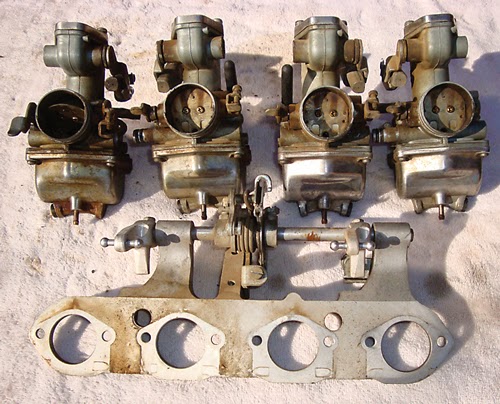
After Frank left, I was inspired to ride my bike. I've been having a ton of problems with it running extremely rich. I'm pretty sure it's because of the altitude/thin air up here. I'm forcing the stock amount of fuel into the motor but it's not able to get enough air and this throws off the ideal air/fuel ratio. This can be remedied by swapping out the main jets and playing around with the mixture screws on each carb. One test you can do is to remove the air filter which can be restrictive and see if it runs any better. So that's what I did. I rode for 50 miles and had all 4 cylinders working when I got back home so it was encouraging. When I pulled the plugs, they were still very black but they were not soaked with fuel so I think I'm on the right track. I have main jets of different sizes on the way and these will allow less fuel to enter each cylinder.


Here's a picture of the final table. I have been accused of building things in excess of what they need to be and this is definitely true in this case. I wanted this table to be able to hold the bike and me at the same time. So I spaced out the stud supports 9" all the way through. It is strong. I still need to build a cleat for the ramp so that there's no danger of it kicking out while rolling the bike up and having it drop which would be a real shame.


There's never a shortage of projects in this house. My Subaru is just shy of 290,000 miles now. I've talked about this car here before. It is amazing. It is not the most attractive car but damn if it isn't reliable. This motor now has about 100,000 on it and it was a Subaru of America crate motor. The trans, diffs, and many other things are ORIGINAL. I've wanted a new vehicle for a while now (particularly since I commute further each day) but I feel obligated to see this odometer hit 300,000. I could have gambled on the timing belt making it that far (it looks to be in great shape) but if it snapped, I would have nothing to trade in so the cost of a new belt kit was worth the peace of mind. The kit arrived yesterday and I wheeled the car into the garage last night to start in on it. I've never done a timing belt on a Subaru before but the 2.5 liter single overhead cam motor really isn't too terrible. The DOHC motor appears to be more involved. Here, the radiator was drained and pulled (I left both fans installed and just pulled it all as one piece), accessory belts have been removed (and look great so they will go back on), and timing belt covers are removed. So this is the area that I'll be focused on. I'm in no hurry to get this done but things were just moving right along last night. I removed that lower left idler pulley, then the one above it, and then the idler gear itself. At this point, the belt falls off. I set the crank and both cams to their appropriate timing marks and then removed the tensioner. While this far in, it would be foolish to not replace the water pump so that gets taken off. This is where things got interesting. I swapped the thermostat (usually you would be wise to install a new one but this t stat was installed not long ago and I felt comfortable reusing it). I put a little RTV on the new pump, put the gasket on and went to button it back up on the motor. It's held on by 6 bolts and one of them stripped out inside the block. I removed it and new that it was the threads inside the aluminum block that gave out. Sometimes you can use a slightly longer bolt and get into fresh threads past the stripped point. It worked but just wasn't enough and that stripped as well. At that point I called it a night because the hardware store wasn't open and I wanted to chew on things for a bit. So today I'll remove the pump, look at the bolt hole and determine if I want to drill/tap it to the next biggest size or simply use a helical kit to repair it.


These are the bogeyed threads. I think thats about it. For now.


Saturday, July 5, 2014

Closer

This picture was, supposedly, taken somewhere in Santa Monica. Unfortunately, that is all I know about this bike. Well...that and I wanna be on it. I love it. Super tasteful and I've always used it as a reference while building mine. Some have said that they don't like my seat (just like this one) but...there are reasons why I keep it. One...so my great wife (who has been incredibly supportive and tolerant during this project as she always is) can sit back there and we can go grab coffee in town. Two, because I have a really simple way to carry camping gear in my head (just need to build it) and hope to be able to do a bit of touring on it next year after a few more issues are addressed. While I could design something that works with a solo seat, I just kinda dig it. 

A while ago I did bob my rear fender but I do want to go more with it. My idea this winter will be to acquire another fender and actually section it and then re-weld it, patch up the holes left from the stock tail light, send it out for chroming and throw it on. I could have a fender custom made but, part of the reason for doing this build in the first place is because I wanted to do as much as I could with my own hands because while I could go get a loan and buy a new bike, it would not be as unique as I wanted it to be. 


I think/hope that I am finally close enough to being able to ride this thing further than around the neighborhood and start to see if it's reliable or not. For months now, I've wrestled with issues with the motor just not running on all cylinders and it's been due to a variety of reasons. This piece showed up today. This is a solid state, modern ignition from Dyna that will replace the 40+ year old points/condensers. A lot of guys like the points system but it does require a lot of attention. You have to make sure that the gap is properly set in order for the ignition system to run properly. If this was a bike that I intended on flipping, I would have simply thrown new points in it but I think this is a bike that I will keep for some time and I wanted it to be as reliable as possible. This setup costed me $134 from Dynoman out of Texas.


Here's the points plate. The points were in bad shape. They are supposed to have less than 1 ohm of resistance and mine were in the upper 30's so they just weren't able to deliver a hot enough spark to the plugs and this was causing a horribly rich condition. The install of the Dyna system isn't horrible but you do have to pay attention. The first step is to remove the points cover and rotate the motor so that cylinder 1 is at top dead center. If you look through the peep hole in between the points, you can see a T and a notch in the housing. To the right of this are the numbers 1-4. At this point, either 1 or 4 are at TDC. I removed the tappet covers for cylinder 1 and they were both tight so I actually had 4 at TDC. If you go 360 degrees around, you end up with 1 at TDC. At that point, the 10mm bolt in the middle is removed as well as the 22mm nut. Disconnect the wiring (a yellow and a blue) and loosen the three Phillips screws and the entire plate comes off. Underneath this is the spark advancer. You have to remove this and replace it with a piece from Dyna. It's important that this piece gets installed in the right orientation. I initially had it 180 degrees out and had to go back and fix it.


Throw the Dyna plate on, insert the 3 screws loosely, as well as the 22mm nut and the 10mm bolt. Now you have to set the timing. This was a little difficult but only because I was eager to fire up the motor and didn't read the directions as carefully as I needed to. I spent quite a bit of time cranking the motor over before I figured out where I screwed up and by then the cylinders were flooded. So I pulled all 4 plugs to let things air out, threw the battery on a charger, walked away, showered, and went with H to Colorado Springs to run errands, grab dinner and get 4 fresh plugs. When we got home, I threw the plugs in, double checked a few things, and she fired right up. I did advance and retard the timing slightly but ended up going right back to where I had it. I took a quick cruise around the block and the motor idles so much better than before. The spark that is being produced is very nice. I'll probably throw a timing light on tomorrow but I know it's damn close.


I was pretty sure that the motor would fire up with fresh plugs but I was still a bit nervous. But not nervous enough for a tall beer.


So on Monday I will get up bright and early, head to Colorado Springs DMV (there is one in particular that I have to go to in order to get my endorsement). Then I'll get the plates and insurance and I'll be able to ride. I'll have tires on the way soon so I won't go too far on the old tires. I may have to ride to Springs to my buddy's place so that I can borrow his vacuum gauges and sync the carbs. Pretty psyched.


Monday, June 30, 2014

Motorcycle for sale

Yesterday marks the second time that I have come in from the garagenous zone with thoughts to sell the cafe racer project. At times, my dad was a tool thrower. I am not. I curse at times but I don't generally do that in the garage when things aren't going well. I just do it cuz it's funny. Yesterday even I was alarmed at what was coming out of my mouth while I paced around. Heather didn't say a word. I probably wasn't quite back from the beach yet to be dicking around with the bike but...I did. 

I decided to order an electronic ignition for the motor and ditch the old style points/condensors. Before I order the kit I wanted to pull the carbs back off and take them apart again. When I rebuilt them I used aftermarket main jets and needles and this has bothered me ever since. I still had the stock brass so I wanted to swap them out. In a fit of sheer stupidity, I broke the part pictured below. As soon as I realized what I had done, the expletives flowed. I couldn't even believe what I had just done. 


You are looking at a plate (called a stay plate) that all 4 carbs attach to. There are 4 pieces that attach to the rod that you see sticking through that cracked ear. It's job is to keep all 4 carbs working in sync with each other so that all 4 cylinders have the same air to fuel ratio. You can see the ear cracked all the way through and so did the bronze bushing inside. Done.


The rod gets inserted in the near side ear in this pic, goes through the piece by my thumb, then through the throttle return spring assembly (not pictured), through the other ear and, finally, through the piece by my finger. Additionally, there is a pin through the far side ear that keeps the rod from moving laterally.


Here you see the cracked ear and bushing, as well as the broken pin.


There's also two metal woodruff keys that help keep the rod in place.


This is what the stay plate looks like once all the carbs all pulled off it. So what started off as an easy job turned into an absolute nightmare. I wasn't sure how I was going to get out of this mess. This 45 year old part that can be a real bitch to locate and if you find one, the owner usually thinks it's made of gold. My first thought after consulting with a friend was to drill the pin out, make a new one, press the bushing out, make a new one, then TIG weld the ear up and use a lathe to make sure that the inside of the ear was 100% smooth. Press the new bushing in. Tap the hole for the pin and use a set screw. But this would take time and I wasn't sure it would even work. So I started looking for a replacement plate. No luck all day yesterday. This afternoon I was finally able to locate a guy that said he had one (although I have yet to see a picture of it). Luckily, he knew me and only wanted $50 for it which I was glad to pay as I've seen plates for the 750 sell for as much as $130. So it should be here by the end of the week. I'm still very nervous and will be until I pull it out of the box and make sure it's the right plate. Usually I don't make mistakes like this so buying this plate has been a real tough pill for me to swallow.


After I realized it was likely that I had found one (this guy actually rebuilds carbs for earlier motorcycles so I trust that he knows what he's got) I took a closer look at what I had. I drilled out a shield on the "pin". It ended up being a set screw after all. So now I may try to fix mine and sell the one that's on the way. We'll see.


The purpose for even opening up the carbs was to replace the stock brass before I installed the new, modern ignition. After that, I will bench sync the carbs again and then vacuum sync the carbs after I get them back on the bike (which should make a big difference). Finally, I'll install the ignition and see where we're at. I'm still having some issues with cylinders 1 and 4 which I believe is because of the bad points. Stay tuned.

R and R

This year H and I decided to go back to the Cabo side of Mexico for our vacation. We stayed in a small town called San Jose del Cabo. We chose this town partly because it was supposed to be a very artistic community and partly because we would be able to walk into town easily from our hotel. There was supposed to be a marina several miles down the beach from us and we wanted to walk there to see about buying a surf rod for me because the surf fishing is amazing all along the beach. Well the marina ended up being a further walk than what we planned but we found a killer bar once we made it there and, wouldn't you know it, they had 2 for 1 beers? So...I got 2 and we sat in the shade for a while. The tackle shop was closed (it was Sunday) so we ended up walking and found an amazing foot path that had all kinds of wonderful art on display. Here were some of my favorites:

Most of the paintings and sculptures that we liked were all from the same lady. She was a British born Mexican and a lot of this work was from the earlier 1900's. It was super freaky. I dug this one just because there was part of a bicycle in it and also because the figures were gnarly looking. 


This sculpture was cool and just reminded me of little Grim Reapers.


This one was crazy and there were so many little things to ponder and consider but, according to the artist, she never really intended for their to be much interpretation in her work. It's just what she had in her head.


The first thing I saw in this one was an "A" that looked a whole lot like an anarchy sign.


The town was very religious and this cross was probably 60-80 feet tall.


It got hot really fast and I think we walked for about 4 hours that day and were both wasted so we flagged down a cab and went back to the hotel. We were stunned to find out that there were no rafts at any of the pools. So...we walked back into town and went to the Mega (it's kind of like a Walmart) and found these kids rafts. They were perfect. We used the hell out of them all week and then found another American couple the day we left and passed them on.


On day 2 I came down with an intestinal infection. It's the first time I've had a bit of Montezuma's Revenge on any of our trips to Mexico so those are pretty good odds and it's part of the gamble you take when leaving the USA. I'll go back but it was NOT fun. I was up all night the first and second night sick and then we decided to go to the doctor the next day. We had to pay in cash but we're able to get some Cipro (which is the common drug administered for this issue). I felt better in 2 more days but still took it real easy in terms of what was going in. I ate a lot of bread and rice.

A few days before we were supposed to leave, we decided to head back into town to explore more. Although we had walked it one night, it was just so fuggin hot that we decided to take a cab. This is walking around the town square where there are a lot of art galleries. Nobody walks in the sun.


Here's another shot of town. It was a gorgeous little area with lot's of friendly people and I'd love to go back when it's cooler.


I think this was our last full night in Mexico and we were just hanging out.


I'm not afraid to drink some tequila. There was a server named Leonel that worked at one of the restaurants and he would always try to bring me tequila but...only the best tequila. The first time he brought me a shooter, he also brought this red shot which I had never seen before. I asked what it was and was told it was Sangrita. This is a liquid (not tomato juice surprisingly) but much of the juice is from Pico De Gallo. There is also some jalapeƱo in it and some other things. It originated in Guadalajara. It is supposed to cleanse the pallet. The shot of tequila is not supposed to be shot but sipped and you sip the Sangrita after each sip of tequila. It was delicious and I may try to make some.


We spent a lot of time looking for art because we wanted a small piece for the house. I also wanted a piece for my desk at work. We saw a lot of Day of the Dead art and I just love it. It is so hard to go into the shops and look around. You get hassled just walking past and it does become a bit of a pain in the ass. We finally found a really nice little shop and a woman was running it with her small boy. She was not pushy at all and wanted to educate us on all the pieces we showed interest in. So we bought several pieces from her. This was the first and I plan to put it on my desk at work.


This is a much larger Day of the Dead skull. All of this is hand painted and there are hummingbirds on the back. We got this because of the colors (orange and blue) and also because we get a lot of hummingbirds at our feeders on the deck and we liked that part.


Then I also found this little evil guy. His head swivels and I just love it. He will probably also go on my desk.


It's good to be back home though but this was an amazing trip. Heather and I are getting more accustomed to travel in foreign countries (mostly me) and we are beginning to take more chances. Many of our friends told us not to go into town but I felt very safe in doing so. We did not care for the resort nearly as much as the others that we have stayed in but that happens. 

Saturday, June 14, 2014

CB500

A few weeks ago I upgraded the ignition coils on the CB to Dyna ones. The stock ones were easily 40 years old and you can't replace the plug wires on them because it's all one piece. The wires were suspect so it had to be done. This install was super easy and made a big difference. However, since then, the bike has started to run poorly and seemed to be getting worse. #4 cylinder is usually dead entirely. So I started to look at the ignition system again. These are the factory points and condensers. Some guys really like these and others hate them. I really don't have an opinion yet. Issues with this setup is that they tend to need adjustment fairly routinely and can be unreliable, thus, stranding a person on the side of the road. 

There's a lobe on that cam (big nut in the middle of the picture) and as the cam turns with the motor, that lobe hits the lever on the left point (half moon shaped critter) and opens it. As the lobe passes, the lever closes and produces a spark which then goes to the plugs at 1 and 4 and fires those cylinders. This process repeats on the other side and again and again. What I've noticed is that my 1 and 4 plugs are not sparking at all so at times I'm running on two cylinders. I reset the points the other night (and even set them on the low side of the range to improve spark) but they still wouldn't produce consistent spark. I cleaned them with 1500 grit paper and acetone. The resistance was about 25-30 ohms before cleaning them and about 1.5 afterwards so it helped. Now you're not supposed to clean these that aggressively or you can ruin them but I'm trying to determine if this is the issue. This helped a lot but spark was still spotty. Then what I noticed is that (with help) if I put my fingers on top of the points and gently push down as the motor turns, then I get spark (and good spark) at the plugs. So I'm pretty sure the points are fried. Possibly because of the hotter spark being produced by the Dyna coils. So now I need to decide if I'm going to try to track down genuine Honda ignition parts (rather hard to locate) or just bite the bullet and upgrade to modern electronic ignition (probably $100 more). I've been sleeping on it for a few days and will likely do so for several more days.  


This issue has gotten really bad the last week and has resulted in zero riding of the bike. This is the right side exhaust. Cylinder 3 is on the bottom and 4 is on the top. 4 is the one that has not been firing at all. There is a small hole on the bottom of 4 (I'm sure designed to help with condensation in the pipes). That's not condensation there. That hot mess express is all fuel and oil that's mixed together and spewed out. It's nasty. It's funny when people ask me, "Are you getting fuel to the cylinder?" I say, "Yes. I'm getting fuel to #4, to my foot peg, to the muffler, and to the car behind me."


Things are slowly coming together with this thing. I passed my motorcycle safety class last week and have a helmet ordered. Once I get this situation sorted, I'll get plates and start to ride it more regularly and work out the kinks a bit more. Then I'd like to do some longer rides to the river to fish and possibly camp. I do need to come up with a way to carry gear other than a gnarly looking milk crate. I think I came up with something the other night while scratching my head with the ignition problem. I need to get some steel, bend it up and weld it together. I drew up my idea and I think it's gonna be perfect. It's going to be super simple, minimal, and clean. Once the gear is installed, you won't even see the racks and they'll be easy to take on and off. Stay tuned.

Friday, June 6, 2014

Summer 2014

Summer is finally here. I cannot believe that I made it through this year. My new job almost killed me. I had shingles, an ulcer, and some disc issues in my neck that flared up again. But today was the first day of my vacation and I couldn't be any happier. I'm a tad bummed that cycling looks pretty much nonexistent for me now but I've got some other things that are stacking up on the bucket list now. Many of them still involve two wheels but they also require a motor in between now. 

This is how this thing looked back in September. 


This is how it looks now. I'm pretty happy but not nearly done yet. My plan for now is to ride it through the summer and get to know it more and continue to think about where I want it to go. Then...in the fall...I plan on stripping it down and doing a major rehab on it that will see a lot of changes including diving into the motor. Stay tuned.


Saturday, May 31, 2014

I haven't updated this thing in a long time. The school year is winding down to a close. I haven't worked on the motorcycle in a while. I've needed some parts and just been too darn tired to order them. I finally found a few minutes earlier in the week to get them ordered. I've been having a problem with cylinder #4 not working. I suspected it was because of the stock coils or wires. Well the 40 plus year old coils tested out ok but the wires were very suspect. Unfortunately, you cannot replace just the wires on this system. Well...you can but it would involve cutting into the coils and removing the wires and then reinserting new ones and figuring out how to seal them from the elements. Seemed like more of a pain than I was willing to do for a bike that I plan on keeping. So I ordered new Dyna coils, wires, and picked up fresh plugs. The stuff showed up on Friday. 


I started on the repair this morning. Here's one coil wired up and ready to go back on. The other one looked the same. Then I had to cut the plug wires and crimp on the new connectors and hook it all up. Right away the bike started significantly better.


I picked up a milk crate today from a friend of mine that didn't need it any longer. This is my idea of how I will carry my waders and boots while riding to the river this summer.


The mile crate will look a bit better once the paint dries. This is NOT something that will be on the bike unless I am going to the river.