Tuesday, October 15, 2013

Cafe Stuff

So I got the front brakes all sorted out on the CB and they work flawlessly. Rebuilding the front caliper was simple. Rebuilding the master cylinder was simple too. A lot of guys bitch and moan about how hard it is to remove the circlip that holds the piston in the MC but I didn't have that much trouble at all. I got the front end of the bike all buttoned up again and decided to fire it up. Then I noticed that the motor was only running on three cylinders. Fourth was dead. So...it was time to pull the carbs. I've put it off long enough. Here they are. I personally think that removing the stock airbox sucks. 


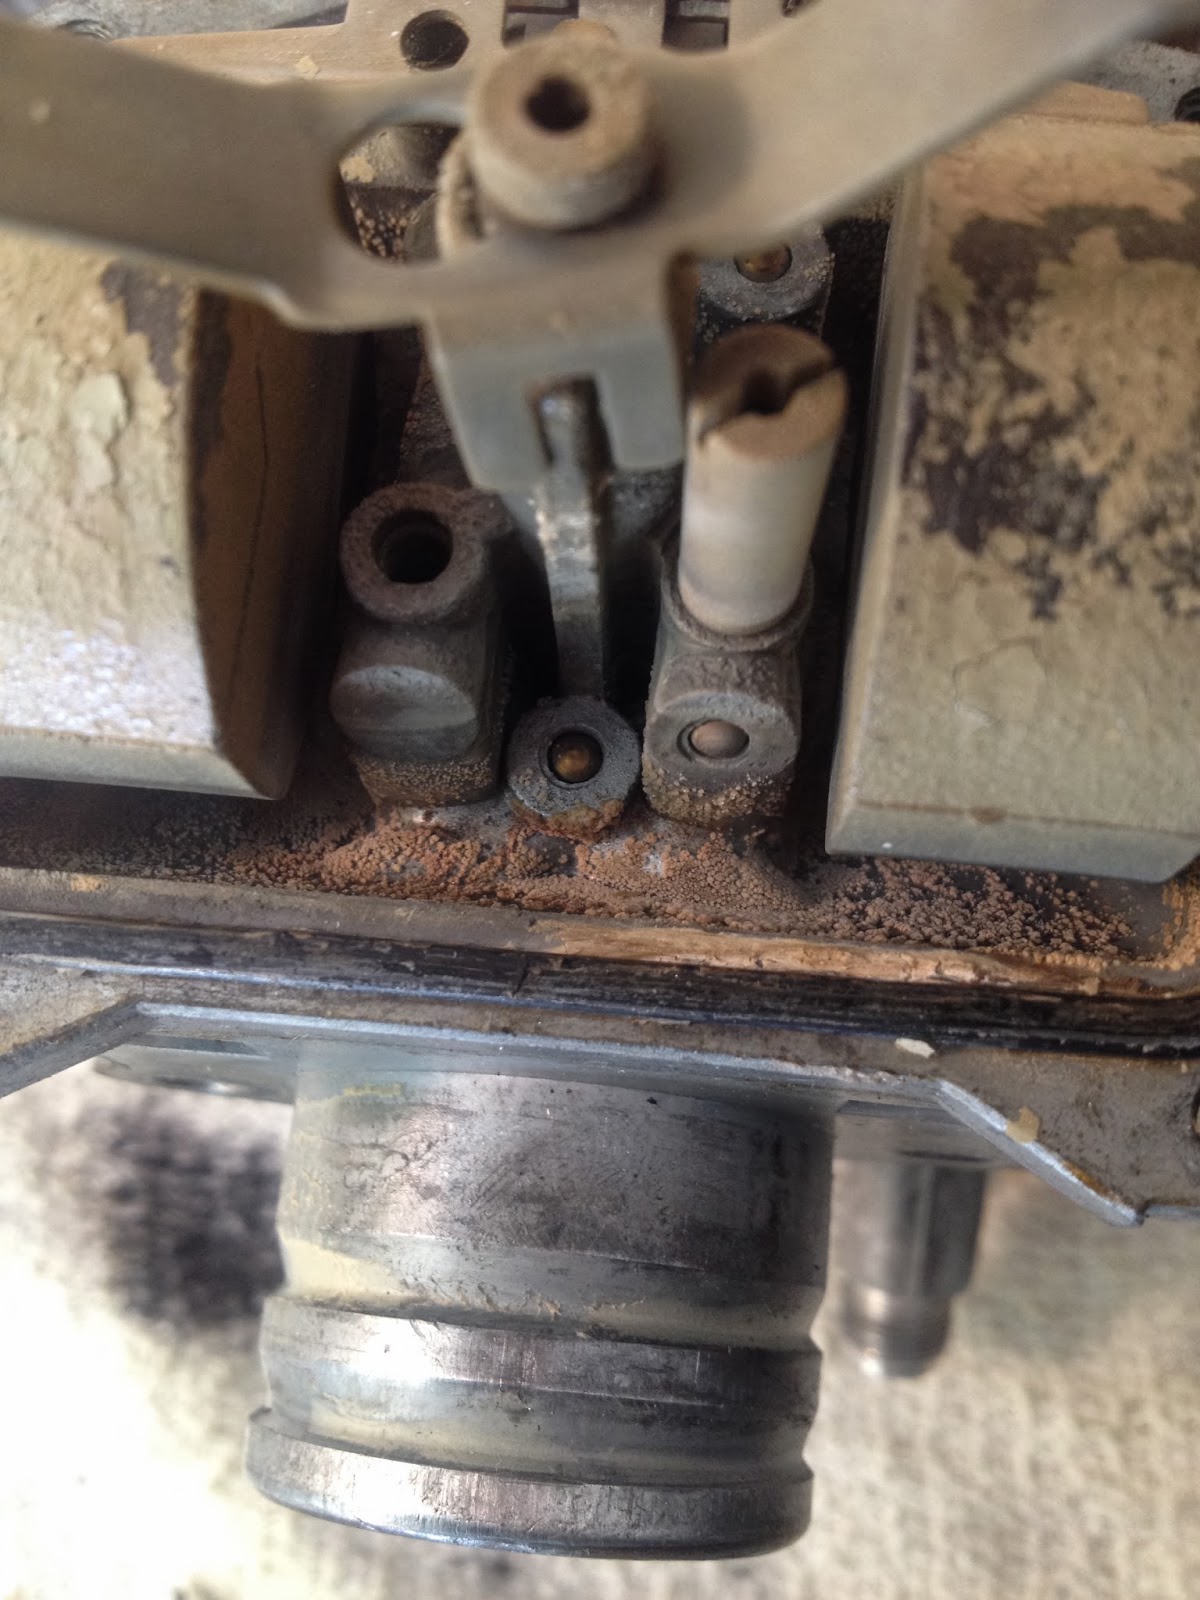
Here was the first issue I found. This washer is found between 1 and 2 and again between 3 and 4. From what I can tell it makes sure that the needles inside go through the main jet and restrict or allow fuel to flow. This washer keeps them working in sync. It is broken and it is no longer made. So...I had to get creative but right away I had a plan.


This is the bowl side of the #4 carb. It was dirty and crystallized and but not as bad as I thought it was going to be. Upon pulling it all apart, I did notice that the idle jet was completely clogged and took quite a bit of work to get cleaned.


This is the #4 carb after it was cleaned along with the bowl and top cap. It is ready to go back together. I'm just waiting on the rebuild kits to show up.


The top piece is a dust shield that is original and, again, no longer made. There's 4 total and 2 were broken. Again...I had an idea in my head.


I did pull the #3 bowl off just to peak inside. It looks worse than 4 did but the idle jet wasn't nearly as plugged up. It is dirtier overall though.


This is the other piece if whipped up last night. Original is up top and mine is down below. It was close to being done in this pic but I worked on it a bit more and now it's exactly the same size. I even sanded it all out and all marks are gone. Looks brand new. It's thicker than the original piece. I see no reason why this should not work.


I'm busy the next 2 nights with parent/teacher conferences so I won't be able to work on it until Friday but I have that day off. So I hope to get the #4 back together and then tear apart 2 and 3 and have them maybe rebuilt by Sunday if all goes well. We'll see.

Tuesday, October 1, 2013

More Cafe

I have decided on a name for my little cafe project. Mabel. I chose this name for several reasons. One, Mabel kinda sounds like Maple and the color on the tank kinda reminds me of that if you use your imagination. It's not quite doo doo brown but, rather, closer to syrup that's been sitting on the plate after enjoying a tall stack. Syrup that's hardened a bit. Second, Mabel is a (or used to be anyways) common name for a female in England. I teach reading and, in the English language, you don't generally have -bel (or -tel, or -ckel). I tell my students it's always -ble (bull), -ckle (cul), or -tle (tul). So...in this way, Mabel goes a bit against the English language grain. Those crazy Brits. So Mabel is kinda like a rebel. 

Today I had to take the day off work so that I could get another (my third) injection in my spine. I got home from that good time and took a nap because they really drugged me up proper. When I woke up I decided to go in the garage and play for a bit. If my doctor knew this he would kick my ass. First I grabbed the 42 year old key to Mabel and walked across the street to the locksmith and he was able to cut me a new one when 2 other places couldn't. The original key was in bad shape. You can see it's bent in an odd way. Came back home, put the key in the ignition, and she fired up. This is great because it saves me from swapping in a totally new ignition which is a bit more than the $2.14 this key cost me.


Next I decided to pull the front brake caliper that seized up on me recently. This is is after pulling it. It really wasn't too bad on the inside. I'm betting the rubber hoses are original as there was quite a bit of debris in the caliper. The brake fluid also resembled syrup and that further solidified the name. This is after I sprayed it out with brake cleaner. You can't really see it in this picture (you will down below a ways) but there is a groove cut into the wall of the caliper that a square shaped seal fits into. Then the piston (pictured below) slips down into the caliper. The seal keeps the fluid from leaking out onto the pads. As force is applied at the lever, the fluid pushes the piston out and actually contorts the square shaped seal into more of a parallelogram shape. When the lever is released, the seal is what really helps pull the piston back and keep it from dragging on the rotor. That seal wants to pop back into square shape. Pretty simple. Mine was not allowing the piston the retract and, probably, for a variety of reasons.


This is the piston. It actually looks to be in really good shape. I've seen many of these from 70's bikes that are pitted and rusted and look like total shit and require that a new piston be purcha$ed. I think this one will be good to use again.


You have to be really careful when cleaning this caliper because you do not want to remove any material from the inside as that compromises it's ability to seal the fluid. I wasn't quite sure what to use but I ended up using a combination of a tiny brass brush on the end of a Dremel, rubbing compound, aluminum polish and some extremely mild steel wool. I think it's ready to go but I'll spend a bit more time polishing it up.


Another shot of the piston after a bit of polishing.


And this is the mess that I have created in an effort to rebuild the brake master cylinder. There's really not too much involved in this job but removing a snap ring that holds the innards together looks to be an absolute bitch. Even with a special pair of new snap ring pliers, I'm not exactly sure how I'm going to get at it. The snap ring is currently soaking in brake fluid to try and free it up a bit. Buying an entirely new MC would be so choice but I am trying desperately to keep costs down. Yes, I have issues with cleanliness and that is the reason for the cardboard on my bench. Brake fluid sucks.


While I had the brake stuff out of the way, and the fender removed, I could not help but keep looking at the atrocity that is the finish on these forks. It's disgusting.


This is not acceptable and, if you know me, you know this already. So I broke out the sandpaper and started to smooth things out. My original goal was to break up the chrome and shine on this front end and paint this black but it's getting too cold to paint up here so I'm gonna shine them up (just not sure how far).


I ended up using steel wool, chemicals, a Dremel, and sandpaper and it took 4 hours to get one leg in the ball park. It's still got a long way to go but winters are looong up here and, generally, I have more time than money.


Getting there.


Finally done with the right leg. At least done for today. I developed a splitting headache which has happened after the last 2 spinal injections and needed to call it a day as seeing straight was getting difficult. I'll probably go back over this leg with finer grit paper. Then even finer grit paper and then I'll polish it out. I probably won't get the chance to work on the master cylinder until Friday night. Then I'll put the caliper back together and get those mounted back up. Then I'll measure for the new brake lines. Not sure where I'm going to get them from yet but they will be custom length stainless steel ones. All of this should really transform the way the front brake works.


Saturday, September 28, 2013

Cafe

This morning I was able to finish up the 3,000 mile tune up. All I had left to do was adjust the valves and the cam chain. Adjusting the valves is pretty straight forward on this motor. After pulling the ignition cover, I set the motor at top dead center for the #1 piston and then removed all of the tappets to gain access to the top of the valves. Here the tappets are already gone. When the crank is put at that position, you'll either have the valves for #1 cylinder loose or the ones for #4 cylinder. If you're like me and prefer to start with cylinder #1 (read...completely anal) and the valves for #4 are loose, just turn the crank another 360 degrees back to the timing mark and then the valves for #1 cylinder will be loose. 


The exhaust valves get adjusted to .08mm with a feeler gauge and you just need a flat blade screw driver and 10mm wrench to make the adjustments. Intake valves get adjusted to .05mm. I adjusted all the valves twice to be sure. When you can adjust #1 cylinder valves, you'll also be able to adjust one of the #2 cylinder valves and one of the #3 cylinder valves. Likewise, you'll hit the other two when both #4 valves are open.


The cam chain on this motor is supposed to be self-adjusting but it's good to check it anyways after setting the valves. It's on the backside of the motor just above the starter cover. You'll see a slotted stud with a 10mm nut on it. The adjustment process for this is to put the motor at 15 degrees after top dead center on the #1 cylinder and crack that 10mm nut loose. Chances are highly likely that you won't even see that slotted stud move (it's that minute if at all). Then snug down the lock nut again. Done.I checked this twice as well.


After everything was buttoned up again, the motor fired up and ran better than before. I took it for a longer ride around town. It still wants to idle funky and now, at 3000 rpm's and in third gear (super steady) you can feel it surge. I'm 99% sure it's just filthy ass carbs. I've suspected this all along but wanted to make sure everything else was right before doing them. So...that's gonna happen soon.

Thursday, September 26, 2013

Cafe Project

I always complained about how shitty I thought clubman bars looked until maybe a few weeks ago. I'm not sure what changed but it had a lot to do with the fact that the drag bars that I was running would not allow the master cylinder and brake lever to rotate any more than they were. It wasn't terribly uncomfortable but I just didn't like it. So in looking for a solution, I had the options of doing risers with the drag bars, switching to a slightly higher rise bar, doing clip ons, or clubmans. This is what I kept coming back to. So I ordered a set from Carpy over at CB750.com and they got here today. This was the perfect time to make the swap because last week the front brakes locked up on me. The CB550 only has one caliper up front and so I went back and forth on this decision too (bout like normal) and finally came to the decision that with only 1 front caliper, everything in the system should be totally gone through for safety's sake. So a master cylinder rebuild kit and a caliper rebuild kit is on the way from the folks at Dime City Cycles. I was hoping to get this stuff rebuilt this weekend but that probably won't happen now because the brake lines I wanted (custom sized) are not in stock right now and I'd rather not bleed the brake twice. The stock lines look like absolute shite with these bars. Instead of a banjo bolt at the master cylinder end, I will use a connector that threads straight in to make the new line tuck in more cleanly behind the light and down to the brake switch that is mounted to the lower triple tree. 

The clubman install was easy peasy. Get rid of everything and then bolt the bars on and try to figure out the position as they can be rotated quite a bit. 


Now after having them on and taking the bike for a quick ride around the block, I can tell right away that I will need to relocate the ignition and starter switch just to clean things up. This means I will have to find a welder. Since I no longer work at the previous school, I don't have access to such a kick ass metal shop. That's ok though...I'd rather buy a welder and do it in my garage or just get in touch with a few buddies who have their own. The more I get into this bike, the more I consider just stripping it down so I can get rid of all extraneous tabs off the frame, relocate the stuff up front, repaint it, etc. but I'm just not sure I want to dive that far in yet. I think there's a load of noobs that get a bike and do that and don't get to know the bike. I can also already tell that the gauges will be getting rebuilt with new faces this winter. I see black faces with white letters and red backlighting.  


I love this shot. It really made the bike look more aggressive. I wasn't sure I'd like this look but I'm in love and ready to get the project rolling.


Another shot from the side. I don't know if you can see in this picture but I've marked up the tank a bit. I really like the stock tank for some reason but even with the drag bars it wasn't all that comfortable. It's a bit worse now. So I'll be trying my hand at body work this winter and putting some knee dents in it.


This is also a cool shot. By spring the bike will get new tires and probably a new exhaust as well. I don't wanna be obnoxious but I really dig Carpy's 500/550 4 into 1 exhaust in black. It sounds mean.


I also need to set the valves and then I will need to remove the carbs and rebuild them. This is something that I'm not looking forward to at all. I've never done any carb work but I really think the idle issues and the stumbling are because they are in need of some TLC and then I'll have to synch all four of them as I do not think all 4 cylinders are on the same page.


I included this picture because it's in my spank bank. Pretty sure this is a seat and tank combo from Benjies. That's a lot of coin sitting there but the knee dents and lower bars are what I've been looking at more and more lately. That front rotor aint shabby either. Or the paint. Thanks for checking in and stay tuned for more updates. This will be a fun project.


Friday, September 20, 2013

Cafe Racer

Got a bit more done on the Cafe Project tonight. New spark plugs went in. Right side exhaust and rear shock was pulled and polished. Rear wheel was polished. Chain was tightened. 


Here are some pics of the filthy rear wheel before I started. 


Another shot of the rear wheel.


Here's everything back together again. I did replace another head stud for the exhaust and got the rear wheel as clean as possible. While reinstalling the right side exhaust, I could feel another stud getting ready to pull out of the head but I'll address that later on.


Right now I have done everything involved in a 3,000 mile tune up but adjust the valves, adjust the cam chain tension, and look at the points and set the timing. I'll try to do that real soon here. It still runs a bit rough. I'm able to ride it around town with no issues but I know it can run better. I think it's running really rich (at least on some of the cylinders). Idle is a bit fawked up. Sometimes it hangs at 2 grand and I have to futz with the idle screw. I'm sure that I will end up rebuilding the carbs soon and synching them and that should make things a lot better.

I'm also trying to figure out what I want to do with bars. Right now I'm running drag bars but the issue is that I can't lower the levers to where they need to be because the master cylinder hits the top triple tree. I could run risers to address this but I'm also now looking at Clubman bars which I've always said I wouldn't run.


Tuesday, September 17, 2013

Cafe Racer

Not sure how I got as much done to the Cafe Project tonight as I did but...I did. I got the neutral wires all tucked back in and out of the way, pulled the clutch cable and lubed it, reinstalled the left side cover, adjusted the clutch cable, pulled the left rear shock and polished it up, pulled the left side exhaust and polished it, cleaned the left side frame and then went to reinstall the exhaust and had a header stud pull out of the head. It doesn't appear to sit too far into the head though so I'm hoping I can get by with a bit longer stud and finding fresh threads a bit deeper. I only need like another quarter of an inch. My life story. Bike is coming around. It fired right up instantly tonight with a good charge on the battery. I hope to get the right side exhaust, shock and frame cleaned and polished by the weekend and then I'll have to tackle the rear wheel. It's a mess. I'll probably pull it and soak it in engine degreaser and then spray it off and polish from there. My air intake parts got here yesterday. I think the motor runs fat so we'll see if the box and filter even things out a bit. If not, then I'll probably look at ignition and adjusting the valves next before finally messing with carbs. The goal is to get this thing as reliable and clean as possible over the winter and be able to ride it next spring/summer and then figure out what I want to do for long term looks like paint. I have some ideas. I also have an issue with the bars. They are drag bars which I really like but the master cylinder hits the top triple tree and can't be adjusted down low enough. It's rideable but not comfy by any means. So since the bars I want are out of stock, I'll either wait until they are back in or throw on some small risers. I'll also go through the wiring over the winter to make sure nothing looks bad. 


Sunday, September 15, 2013

More CB500/550 Stuff

So I posted a picture of my new to me motorcycle on an older CB forum. Someone said..."Hey are you sure that's a CB550?" He noticed that the brake pedal wasn't the one on the 550 model. So...after looking at the VIN on the frame and the motor I realized that I bought a 550 frame with a 500 motor in it. The frame is a 76 but the motor is a 71. I was a bit bummed because I pretty much got taken but the 500 is still a good motor. If I was wanting to do a full restoration then I'd get rid of it but I just wanted a project to play with so it doesn't matter all that much and this one is pretty clean with good potential. 

As I was going through the front end, I noticed that the front brake did not activate the stop light. I did have a switch on the front brake but no wiring. So last week I started looking into that. The issue for me as a novice was that I didn't know if I had a 500 or a 550 wiring harness and that makes a difference when looking for specific wires. After a lot of time with a multimeter, I finally located the correct wires. 


I got the switch wired up and now...the front brakes activate the stop light. The bike sat for the rest of the week. One of the things I have learned about owning an older CB is that parts are damn hard to find. Right now there is no filter on the carbs. The airbox alone costs 150 and that's if you can find it. I managed to find all the intake parts I needed (NOS boots from the box to the carbs, hardware, and new UNI filter). The only thing I didn't find is a spring that holds the filter in the box. Apparently these are like finding a brick of gold. I'll have to come up with something. This stuff should be here this week and then I'll feel better about starting it up.


For some reason, I happened to be looking at the under carriage of the motorcycle and noticed a drop of oil. For those that know me, this is a problem. I pulled the left side motor cover to reveal this mess.


This is the same damn repair I did on my friend's CB650. The shift shaft seal was leaking. This one was pretty much gone. I replaced the counter shaft sprocket seal too after cleaning everything up in a manner that only I am capable of.


Here's the motor with the new counter shaft sprocket seal, and shift shaft seal in place. The upper left seal is the clutch push rod seal and I couldn't find one. It looked fine. I put it all back together and went to start it up. I heard nothing but the breeze and rain outside. This was either Friday or Saturday night.


I pulled the cover back and off and hit the starter button and it fired up. Then I wondered if I had pinched a wire while putting the cover back on. Everything was fine. Then I started looking at this thing. This is the neutral switch. It only allows the starter to spin and start the motor while the trans is in neutral. As you shift gears, the cylinder rotates and no longer allows the 2 copper pieces to make contact. I was able to find a testing procedure but kept getting readings saying that it was broken. But there's not really much involved in this switch. It took me pretty much all damn day today to figure out that the contact between the copper points was weak. By this time the battery is drained so I don't know  if I'm making any progress or not. I removed the switch totally. I cleaned it and bent that tab on the left a bit more and reinstalled things. Then I tested it again and got readings indicating that the switch was fine. It was then that I got excited. Too bad the battery was too weak to find out for sure. So...I pulled in a car and hooked up some jumper cables. I had a moment of silence with Heather. Turned the key on. Pushed the starter button. It fired right up. I think I'm in the clear. Now I just have to recharge the battery and wait for my intake parts to get here. I also have new plugs and carb cleaner to start running through the system to see if that helps.